
Exploring Go's Standard Library and Tooling
One of the many strengths of Go that really drew me in to this language was that it has an extremely rich standard library which is packed with a wide range of functionality. This allows you to not have to rely too heavily on external packages and keeps external dependencies at a minimum.
This article aims to shed light on the power of Go's standard library as well as provide a walkthrough on all of the Go tools that make developing, testing, and deploying easier.
The Power of Go's Standard Library
net/http
The net/http package provides HTTP client and server implementations and is a cornerstone for Web development in Go. There are many external web frameworks
that exist such as Echo / Gin / Fiber which can offer features like optimized routing, middleware, and context-based request handling, but the standard library
itself is extremely powerful and easy to use. It may be all that you need!
package main

import (
    "fmt"
    "net/http"
)

func handler(w http.ResponseWriter, r *http.Request) {
    fmt.Fprintf(w, "Hello, World!")
}

func main() {
    http.HandleFunc("/", handler)
    http.ListenAndServe(":8080", nil)
}
When invoking ListenAndServe, the handler is typically nil, in which case the DefaultServeMux is used.
As you can see, in a couple of lines of code, you can easily run a web server and expose a route!
datbase/sql
The database/sql package provides a generic interface around SQL databases, allowing developers to work with different database systems in a consistent manner.
This package must be used in combination with a database driver (See the _ "github.com/go-sql-driver/mysql" import below) and there are many open source drivers available to choose from!
package main

import (
    "database/sql"
    _ "github.com/go-sql-driver/mysql"
    "log"
)

func main() {
    db, err := sql.Open("mysql", "user:password@tcp(127.0.0.1:3306)/dbname")
    if err != nil {
        log.Fatal(err)
    }
    defer db.Close()

    // Execute a query
    rows, err := db.Query("SELECT id, name FROM users")
    if err != nil {
        log.Fatal(err)
    }
    defer rows.Close()

    for rows.Next() {
        var id int
        var name string
        if err := rows.Scan(&id, &name); err != nil {
            log.Fatal(err)
        }
        log.Println(id, name)
    }
}
In the example above, we open a database by specifying the database driver name and connection details which provides a Database Handle safe for concurrent use by multiple goroutines.
You can easily execute a SQL query to fetch data and retrieve a cursor, using a range iterator to advance from row to row. Scan will copy the columns in the current row into the pointer params.
sync
The sync package provides basic synchronization primitives such as mutual exclusion locks and wait groups, essential for concurrent programming.
package main

import (
    "fmt"
    "sync"
)

func main() {
    var wg sync.WaitGroup

    for i := 1; i <= 10; i++ {
        wg.Add(1)
        go func(i int) {
            defer wg.Done()
            fmt.Println(i)
        }(i)
    }

    wg.Wait()
}
In the example above, the main go routine will wait for all of the spawned go routines to finish printing the index before the main routine completes.
encoding/json
The encoding/json package makes it easy to encode and decode JSON data, a common requirement in modern web applications.
package main

import (
    "encoding/json"
    "fmt"
    "log"
)

type Person struct {
    Name string `json:"name"`
    Age  int    `json:"age"`
}

func main() {
    p := Person{Name: "Alice", Age: 30}
    data, err := json.Marshal(p)
    if err != nil {
        log.Fatal(err)
    }
    fmt.Println(string(data))
}
Notice the go tags defined in the struct for each field denoted as "json". Once the data is marshaled and printed, the json keys for Name and Age will be the names defined in these tags.
There is so much more in Go's standard library to dive into. The examples above highlights some of them.
Essential Go Tooling
Go also comes with a very powerful set of tools that extend its functionality beyond the core language features. These tools assist with various aspects of development, including compilation, debugging, testing, and profiling. Here's a brief overview of each of these tools:
| Tool | Description | Link |
|---|---|---|
addr2line | Translates program addresses to file names and line numbers | addr2line |
asm | The Go assembler, converts assembly language files to machine code | asm |
buildid | Extracts and manipulates the build ID | buildid |
cgo | Enables Go packages to call C code | cgo |
compile | The Go compiler, compiles Go source code into object files | compile |
covdata | Processes coverage data files | covdata |
cover | Analyzes test coverage profiles | cover |
dist | Tool for building and testing the Go distribution | dist |
distpack | Packages and distributes Go distributions | distpack |
doc | Displays documentation for a package or symbol | doc |
fix | Updates Go programs to use the latest language features | fix |
link | The Go linker, links object files into an executable binary | link |
nm | Lists names of symbols defined in object files or binaries | nm |
objdump | Disassembles executable files into machine code instructions | objdump |
pack | Archive tool, similar to Unix ar | pack |
pprof | Profiles Go programs to identify performance bottlenecks | pprof |
test2json | Converts test output to JSON format | test2json |
trace | Generates and analyzes trace files for detailed execution analysis | trace |
vet | Examines Go source code and reports potential issues | vet |
Here is a quick rundown of each of these tools:
addr2line
The addr2line tool translates program addresses into file names and line numbers. This is helpful as it can aid in debugging by pinpointing where a particular piece of code resides in the source files.
Say you have a simple program like so (comments to the right indicate the line number):
package main                        // 1
                                    // 2
import "fmt"                        // 3
                                    // 4
func main() {                       // 5
	fmt.Println("Hello World!")     // 6
}                                   // 7
You can then build the binary: go build -o output_binary main.go
To generate the dissasembly of all code in the binary: go tool objdump -s main output_binary. The -s flag denotes to only dump symbols matching main for brevity.
Here is the dissasembled code:
TEXT main.main(SB) /Users/kavin/Desktop/main.go
main.go:5		    0x10008cb80		f9400b90		MOVD 16(R28), R16
main.go:5		    0x10008cb84		eb3063ff		CMP R16, RSP
main.go:5		    0x10008cb88		540002c9		BLS 22(PC)
main.go:5		    0x10008cb8c		f81b0ffe		MOVD.W R30, -80(RSP)
main.go:5		    0x10008cb90		f81f83fd		MOVD R29, -8(RSP)
main.go:5		    0x10008cb94		d10023fd		SUB $8, RSP, R29
main.go:6		    0x10008cb98		a903ffff		STP (ZR, ZR), 56(RSP)
main.go:6		    0x10008cb9c		f0000145		ADRP 176128(PC), R5
main.go:6		    0x10008cba0		912b00a5		ADD $2752, R5, R5
main.go:6		    0x10008cba4		f9001fe5		MOVD R5, 56(RSP)
main.go:6		    0x10008cba8		90000205		ADRP 262144(PC), R5
main.go:6		    0x10008cbac		910240a5		ADD $144, R5, R5
main.go:6		    0x10008cbb0		f90023e5		MOVD R5, 64(RSP)
print.go:314		0x10008cbb4		b00005bb		ADRP 741376(PC), R27
print.go:314		0x10008cbb8		f9437761		MOVD 1768(R27), R1
print.go:314		0x10008cbbc		90000200		ADRP 262144(PC), R0
print.go:314		0x10008cbc0		91132000		ADD $1224, R0, R0
print.go:314		0x10008cbc4		9100e3e2		ADD $56, RSP, R2
print.go:314		0x10008cbc8		b24003e3		ORR $1, ZR, R3
print.go:314		0x10008cbcc		aa0303e4		MOVD R3, R4
print.go:314		0x10008cbd0		97ffeca8		CALL fmt.Fprintln(SB)
main.go:7		    0x10008cbd4		a97ffbfd		LDP -8(RSP), (R29, R30)
main.go:7		    0x10008cbd8		910143ff		ADD $80, RSP, RSP
main.go:7		    0x10008cbdc		d65f03c0		RET
main.go:5		    0x10008cbe0		aa1e03e3		MOVD R30, R3
main.go:5		    0x10008cbe4		97ff527b		CALL runtime.morestack_noctxt.abi0(SB)
main.go:5		    0x10008cbe8		17ffffe6		JMP main.main(SB)
main.go:5		    0x10008cbec		00000000		?
Using the addr2line command, you can pipe an address to output the exact file and line. Address 0x10008cb98 is the start of the call to fmt.Println().
❯ echo 0x10008cb98 | go tool addr2line output_binary
main.main
/Users/kavin/Desktop/main.go:6
The output above shows that this address correlates with line 6 in the code block example above. This can be really helpful to dig deeper into function calls. Address 0x10008cbb4 is the call being made using the fmt package in Go's standard library.
❯ echo 0x10008cbb4 | go tool addr2line output_binary
main.main
/opt/homebrew/Cellar/go/1.22.3/libexec/src/fmt/print.go:314
We now have the exact file and line of the function call. Taking a look at the function call from the path above, we can dig deeper into the actual code:
sed -n '310,316p' /opt/homebrew/Cellar/go/1.22.3/libexec/src/fmt/print.go
// Println formats using the default formats for its operands and writes to standard output.
// Spaces are always added between operands and a newline is appended.
// It returns the number of bytes written and any write error encountered.
func Println(a ...any) (n int, err error) {
	return Fprintln(os.Stdout, a...)
}
asm
The asm tool will assemble the source file into an object file that can then be combined with other objects into a package archive. Say we have this simple program with a function that multiplies two integers:
package main

import "fmt"

func multiply(a, b int) int {
	return a*b
}

func main() {
	fmt.Println(multiply(2, 3))
}
We can build the binary without optimizations (so as to prevent inlining) via: go build -gcflags="-N -l" -o output_binary main.go.
To see the dissasembled code of the multiply function: go tool objdump -s multiply output_binary.
TEXT main.multiply(SB) /Users/kavin/Desktop/main.go
main.go:5		0x10008cbf0		f81e0ffe		MOVD.W R30, -32(RSP)
main.go:5		0x10008cbf4		f81f83fd		MOVD R29, -8(RSP)
main.go:5		0x10008cbf8		d10023fd		SUB $8, RSP, R29
main.go:5		0x10008cbfc		f90017e0		MOVD R0, 40(RSP)
main.go:5		0x10008cc00		f9001be1		MOVD R1, 48(RSP)
main.go:5		0x10008cc04		f9000bff		MOVD ZR, 16(RSP)
main.go:6		0x10008cc08		9b017c00		MUL R1, R0, R0
main.go:6		0x10008cc0c		f9000be0		MOVD R0, 16(RSP)
main.go:6		0x10008cc10		910063fd		ADD $24, RSP, R29
main.go:6		0x10008cc14		910083ff		ADD $32, RSP, RSP
main.go:6		0x10008cc18		d65f03c0		RET
main.go:6		0x10008cc1c		00000000		?
We can then create an assembly file of the multiply function, called multiply.s using the instruction set from above:
TEXT ·multiply(SB), $0-32
    MOVD.W R30, -32(RSP)
    MOVD R29, -8(RSP)
    SUB $8, RSP, R29
    MOVD R0, 40(RSP)
    MOVD R1, 48(RSP)
    MOVD ZR, 16(RSP)
    MUL R1, R0, R0
    MOVD R0, 16(RSP)
    ADD $24, RSP, R29
    ADD $32, RSP, RSP
    RET
The command go tool asm multiply.s will then generate the multiply.o object file. Object files in Go, created via go tool asm, are binary files that contain machine code resulting from the assembly of your Go assembly code.
Some important remarks to note about asm:
- The
go tool asmcommand translates Go assembly language into machine code. It's typically used internally by the Go build system and not directly by developers. - The output of
go tool asmis an object file with a.oextension. This file contains machine code that can be linked with other object files to create an executable program. (When usinggo tool link) - In the context of Go, these object files are typically not used directly. Instead, the Go build system internally / automatically compiles, assembles, links, and runs Go programs when you use commands like
go runorgo build.
buildid
The go tool buildid command is used to extract the build ID from a Go binary or object file. This value is a unique string that identifies the binary's exact source code version and build options, allowing the binary to be linked with exactly matching library versions.
When you run go tool buildid main, it will print the build ID of the binary or object file named main. If main is a binary produced by go build, this will be the build ID that was recorded when the binary was built.
Here's an example of how you might use it:
package main

import "fmt"

func main() {
	fmt.Println("Hello, World!")
}
After building via go build main.go, you can then fetch the buildid via go tool buildid main outputting:
XAKK-mWyQ90MmSnvFY5G/220p34EodWBr9q8fadGo/AYkB4x7jYQ1UyE-8HWwE/7tYCGTO64uKEFKZ16GIs
This build ID can be used for debugging and troubleshooting, as it allows you to identify the exact version of the code and build options that were used to produce a binary.
You can also use the -w option to rewrite the build ID found in the file to accurately record a content hash of the file.
cgo
CGO is a tool in the Go programming language that allows Go code to call C code and vice versa. It enables Go programs to use existing C libraries and allows Go code to be called from C.
This is particularly useful when you have existing C libraries that you want to use in your Go applications or if you need to interface with C code for performance reasons.
As an example, here is a sample c program:
// hello.c
#include <stdio.h>

void hello() {
    printf("Hello, World!\n");
}
We can leverage cgo to invoke this hello function:
// main.go
package main

// #include "hello.c"
import "C"

func main() {
    C.hello() // Calling the hello function in C!
}
Now run go run main.go to see "Hello, World!" being printed to the stdout!
Things to note:
- The "C" package that is being imported is a "pseudo-package" that
cgoprovides for interaction with C code. - The
// #include "hello.c"comment tellscgoto include the contents of hello.c in the Go source file. This is fairly similar to how#includeworks inC. - We then call the C function! (We could also use C variables and types as if they were defined in go)
compile
The compile tool can be used to compile a single Go package comprising of 1 or many files and writes a single object file which can be combined with other objects into a package archive (see the pack section below) or also passed directly to the linker (see the link section below).
You may have seen compile used in other sections.
Here is a short example:
package main

func main() {
	println("Hello World!")
}
We can compile like so: go tool compile -o main.o main.go.
covdata
The covdata tool can be used for manipulating and generating reports from 2nd-generation coverage testing output files which are produced from running applications or integration tests.
It is part of Go's coverage analysis toolkit, here is a breakdown of the sub commands:
Commands are:

textfmt     convert coverage data to textual format
percent     output total percentage of statements covered
pkglist     output list of package import paths
func        output coverage profile information for each function
merge       merge data files together
subtract    subtract one set of data files from another set
intersect   generate intersection of two sets of data files
debugdump   dump data in human-readable format for debugging purposes
Here is an example of using the func sub command:
package main

func Blank() {

}

func Add(a, b int) int {
	return a + b
}

func main() {
	_ = Add(1, 2)
}
In the example above, we can see that the Blank function is exported but unused anywhere and go build will not output any issues via the following command:
go build -cover -o main . (-cover will enable code coverage instrumentation.)
After running the binary while passing the GOCOVERDIR env variable via GOCOVERDIR=./coverage ./main, two files will be generated in that directory:
covcounters.*covmeta.*
We can then leverage the covdata tool to check function coverage:
❯ go tool covdata func -i=coverage

github.com/kavinaravind/go-multiply/main.go:3:  Blank           0.0%
github.com/kavinaravind/go-multiply/main.go:7:  Add             100.0%
github.com/kavinaravind/go-multiply/main.go:11: main            100.0%
total                                           (statements)    100.0%
As you can see from above, the Blank function was never invoked. This can be a very helpful tool to aid in debugging / testing.
cover
The cover tool can be used to analyze the coverage profiles generated by go test -coverprofile=coverage.out ./....
It can generate an HTML representation of a coverage profile making it extremely easy to visualize what has and has not been fully tested.
Here is an example:
package main

func Max(a, b int) int {
	if a > b {
		return a
	}
	return b
}

func main() {
	_ = Max(1, 2)
}
There is aready a built in max function in Go, but for simplicity, lets define one.
Here is the test for Max:
package main

import "testing"

func TestMax(t *testing.T) {
	if Max(2, 3) != 3 {
		t.Errorf("Max(2, 3) = %d; want 3", Max(2, 3))
	}
}
We can now generate a coverage file like so: go test -coverprofile=coverage.out ./...
Now lets visualize the coverage via: go tool cover -html=coverage.out
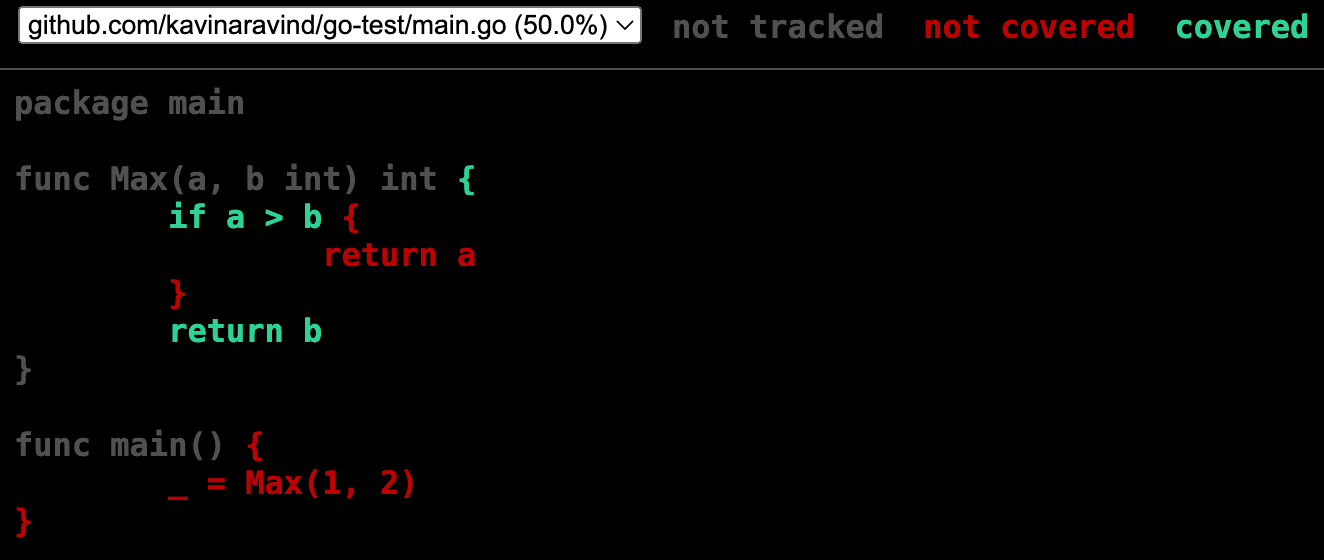
As you can see, we only have 50% test coverage with the branching conditional only testing half of the statements.
This is a trivial example, but you can imagine how useful this can be for a very large code base!
dist
The dist tool is used for building, testing, and managing the Go distribution itself.
Here are the main tasks in that process:
- Building the Go Toolchain which consists of compiling the Go compiler, linker, and additional tools
- Running Tests on the Go Toolchain and the Standard Library
- Creating distribution packages of the source code
Here are the available sub-commands:
usage: go tool dist [command]
Commands are:

banner                  print installation banner
bootstrap               rebuild everything
clean                   deletes all built files
env [-p]                print environment (-p: include $PATH)
install [dir]           install individual directory
list [-json] [-broken]  list all supported platforms
test [-h]               run Go test(s)
version                 print Go version

All commands take -v flags to emit extra information.
❯ go tool dist test


##### Test execution environment.
# GOARCH: arm64
# CPU:
# GOOS: darwin
# OS Version: Darwin 23.5.0 Darwin Kernel Version 23.5.0: Wed May  1 20:12:58 PDT 2024; root:xnu-10063.121.3~5/RELEASE_ARM64_T6000 arm64

##### Testing packages.
ok      archive/tar     0.169s
ok      archive/zip     0.245s
ok      bufio   0.304s
ok      bytes   0.368s
ok      cmp     0.356s
...
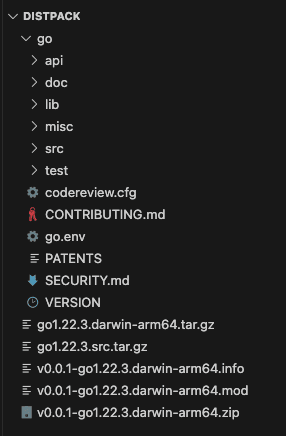
distpack
The distpack tool is mainly used for creating a Go source distribution package. As a Golang developer or maintainer, you can package the Go source code into a tarball or zip file that can be distributed and used to build the Go toolchain from source.
Its pretty convenient to execute the tool and bundle the entire Go toolchain!
Here is an example:
❯ go version
go version go1.22.3 darwin/arm64

❯ go tool distpack
distpack: 85c9614fb0997587 go1.22.3.src.tar.gz
distpack: 74cb7fad34b4695b go1.22.3.darwin-arm64.tar.gz
distpack: 741ed665d97042f5 v0.0.1-go1.22.3.darwin-arm64.zip
distpack: 58528cce1848ddf4 v0.0.1-go1.22.3.darwin-arm64.mod
distpack: 09741b30cd12ae08 v0.0.1-go1.22.3.darwin-arm64.info

❯ go env | grep GOROOT
GOROOT='/opt/homebrew/Cellar/go/1.22.3/libexec'

❯ ls -lh /opt/homebrew/Cellar/go/1.22.3/libexec/pkg/distpack/
total 514208
-rw-r--r--  1 kavin  admin    96M Jun  3 13:49 go1.22.3.darwin-arm64.tar.gz
-rw-r--r--  1 kavin  admin    26M Jun  3 13:49 go1.22.3.src.tar.gz
-rw-r--r--  1 kavin  admin    74B Jun  3 13:49 v0.0.1-go1.22.3.darwin-arm64.info
-rw-r--r--  1 kavin  admin    28B Jun  3 13:49 v0.0.1-go1.22.3.darwin-arm64.mod
-rw-r--r--  1 kavin  admin   100M Jun  3 13:49 v0.0.1-go1.22.3.darwin-arm64.zip
Here are the assets that were created, the go directory is the contents after extracting go1.22.3.src.tar.gz:
doc
The doc tool can help provide documentation for Go packages, functions, types, and methods directly in the terminal by extracting documentation from Go source code and presenting it in a readable format.
Here is an example:
package main

// Add returns the sum of two integers.
func Add(a, b int) int {
	return a + b
}

func main() {
	_ = Add(1, 2)
}
By using the doc command:
❯ go tool doc Add
func Add(a, b int) int
    Add returns the sum of two integers.
The command can aslo be used for the standard library:
❯ go tool doc fmt.Println
package fmt // import "fmt"

func Println(a ...any) (n int, err error)
    Println formats using the default formats for its operands and writes to
    standard output. Spaces are always added between operands and a newline
    is appended. It returns the number of bytes written and any write error
    encountered.
fix
The fix tool is used to automatically update Go source code to use the latest language features and library APIs. This can be extremely useful when there are backward-incompatible changes or deprecated features in new versions of Go.
Using the -help flag will output available fixes: go tool fix -help
Available rewrites are:

buildtag
        Remove +build comments from modules using Go 1.18 or later

cftype
        Fixes initializers and casts of C.*Ref and JNI types

context
        Change imports of golang.org/x/net/context to context

egl
        Fixes initializers of EGLDisplay

eglconf
        Fixes initializers of EGLConfig

gotypes
        Change imports of golang.org/x/tools/go/{exact,types} to go/{constant,types}

jni
        Fixes initializers of JNI's jobject and subtypes

netipv6zone
        Adapt element key to IPAddr, UDPAddr or TCPAddr composite literals.

        https://codereview.appspot.com/6849045/

printerconfig
        Add element keys to Config composite literals.
Here is an example of the context fix:
package main

import (
	"fmt"
	"time"

	"golang.org/x/net/context"
)

func main() {
	ctx, cancel := context.WithTimeout(context.Background(), 3*time.Second)
	defer cancel()

	ticker := time.NewTicker(1 * time.Second)
	defer ticker.Stop()

	for {
		select {
		case <-ticker.C:
			fmt.Println("Tick")
		case <-ctx.Done():
			fmt.Println("Completed")
			return
		}
	}
}
After running go tool fix main.go, you can see main.go: fixed context as the ouput with the import changing from "golang.org/x/net/context" to "context".
link
The link tool is used to link object files and create an executable binary. It is normally used in the build process and it works by taking object files, linking them together, and coupling this with the Go runtime which produces the final executable.
Here is where it is used:
package main

func main() {
	println("Hello, World!")
}
We can build the following program above and specify the -x option to print all the steps that Go goes through when building the executable: go build -x main.go
❯ go build -x main.go
WORK=/var/folders/vn/gg55268526q0f6fw1xj_8v_w0000gn/T/go-build234616458
mkdir -p $WORK/b001/
cat >/var/folders/vn/gg55268526q0f6fw1xj_8v_w0000gn/T/go-build234616458/b001/importcfg.link << 'EOF' # internal
packagefile command-line-arguments=/Users/kavin/Library/Caches/go-build/19/19f582e8e6bd738c44b63f47bb26f68a90a3632cbefd1ae846f6a2f1eee8cc61-d
packagefile runtime=/Users/kavin/Library/Caches/go-build/5f/5fbc933cd4117610d5901293b681c430fb15cd76342e908ef920bc751b16b354-d
packagefile internal/abi=/Users/kavin/Library/Caches/go-build/34/34d47a794077764918ae87c8b070f8103a27dbd5b40ce55770ddacf7b1039348-d
packagefile internal/bytealg=/Users/kavin/Library/Caches/go-build/59/59a4bf5b67f3ad0f3b5aa8cf769bab150a8d18595591ab5dc0c399f763e78cc0-d
packagefile internal/chacha8rand=/Users/kavin/Library/Caches/go-build/40/4064494834b15617c625184104fd9cff9fae11a082c03d6101c3cd9cd080f306-d
packagefile internal/coverage/rtcov=/Users/kavin/Library/Caches/go-build/40/40f8f9b8d596435bb944a2af90ada9dfc9277562283386f460acd41a0dc32718-d
packagefile internal/cpu=/Users/kavin/Library/Caches/go-build/e7/e7aee3407f9a6f112c2b1f45acc29e14679d4f4b87b2e993fb7dbd005cf78e88-d
packagefile internal/goarch=/Users/kavin/Library/Caches/go-build/e0/e095f283908d42a0369a7b0246ca360f5243fa735e3ac9312fd6ed0c35f41ef0-d
packagefile internal/godebugs=/Users/kavin/Library/Caches/go-build/29/29f17d432c1c8917701b9c8644ee5b6115819c8aa0ce4c040190e6bed634f19d-d
packagefile internal/goexperiment=/Users/kavin/Library/Caches/go-build/f8/f883856824d8c7e2fe8ecdbe2f5ccef3b4603838891434821f0d73006b3f049a-d
packagefile internal/goos=/Users/kavin/Library/Caches/go-build/12/12836bbae94d43ae856861b110763e765263fd3a8cab2dd75d1ee13cdff043d0-d
packagefile runtime/internal/atomic=/Users/kavin/Library/Caches/go-build/29/2967cae2b20b766397513a3582913f9ecb3034b3c3b5fa2f50ec74d565cf9a2e-d
packagefile runtime/internal/math=/Users/kavin/Library/Caches/go-build/54/54aadd362f172b1f21d9cba8f7df454d95d434f97476dc819e1ad2c5a6955876-d
packagefile runtime/internal/sys=/Users/kavin/Library/Caches/go-build/ff/ff7d9ebfc6e763898629ae9e91658ce00767e5ed58d59b150f234d040f9d490d-d
modinfo "0w\xaf\f\x92t\b\x02A\xe1\xc1\a\xe6\xd6\x18\xe6path\tcommand-line-arguments\nbuild\t-buildmode=exe\nbuild\t-compiler=gc\nbuild\tCGO_ENABLED=1\nbuild\tCGO_CFLAGS=\nbuild\tCGO_CPPFLAGS=\nbuild\tCGO_CXXFLAGS=\nbuild\tCGO_LDFLAGS=\nbuild\tGOARCH=arm64\nbuild\tGOOS=darwin\n\xf92C1\x86\x18 r\x00\x82B\x10A\x16\xd8\xf2"
EOF
mkdir -p $WORK/b001/exe/
cd .
/opt/homebrew/Cellar/go/1.22.3/libexec/pkg/tool/darwin_arm64/link -o $WORK/b001/exe/a.out -importcfg $WORK/b001/importcfg.link -buildmode=pie -buildid=a8NU1cJQTc6C9gNDnRBA/9FtOacIOBQmTycosHfS1/lUTdj4cOOX5DPQD_pzqi/a8NU1cJQTc6C9gNDnRBA -extld=cc /Users/kavin/Library/Caches/go-build/19/19f582e8e6bd738c44b63f47bb26f68a90a3632cbefd1ae846f6a2f1eee8cc61-d
/opt/homebrew/Cellar/go/1.22.3/libexec/pkg/tool/darwin_arm64/buildid -w $WORK/b001/exe/a.out # internal
mv $WORK/b001/exe/a.out main
rm -rf $WORK/b001/
We can see the exact link command that was run to generate a.out and the various flags involved!
nm
The nm tool lists the symbols defined or used by an object file, archive, or executable.
Here is a short example:
package main

func main() {
	println("Hello World!")
}
We can compile like so: go tool compile -o main.o main.go.
Using the nm tool we can see the following symbols:
❯ go tool nm main.o
    U
    U
    U /Users/kavin/Downloads/go-test/main.go
64f R gclocals·g2BeySu+wFnoycgXfElmcg==
65d ? go:cuinfo.packagename.main
657 ? go:cuinfo.producer.<unlinkable>
636 R go:string."Hello World!"
642 R go:string."Hello World!\n"
5ab D main..inittask
55b T main.main
Heres an exaplanation of these symbols:
Uis an undefined symbol, meaning that the symbol is referenced but not defined in this object file. This is often seen with external dependencies or when debugging information is included.Ris a read-only data section, typically used for constants such as string literals.Dis a data section, usually containing global variables.Tis a text section, which contains the executable code (functions).?is a symbol whose section is unknown or not typical. This can occur with debug symbols or other metadata.
objdump
You may have already seen the objdump tool being used in other sections! The reason this specific command is detailed later on in this guide, is becuase I wanted to follow the same order defined in the standard library.
The objdump tool is used to disassemble Go binaries and object files which can provide a human-readable representation of the actual machine code. This can be helpful for debugging at a low-level and in general learning how the Go compiler generates code.
Here is a short example:
package main

import "fmt"

func main() {
    fmt.Println("Hello, world!")
}
After building via go build -o main main.go, we can disassemble the binary via go tool objdump -s main.main main
❯ go tool objdump -s main.main main
TEXT main.main(SB) /Users/kavin/Downloads/go-test/main.go
main.go:3             0x10005c8b0             f9400b90                MOVD 16(R28), R16
main.go:3             0x10005c8b4             eb3063ff                CMP R16, RSP
main.go:3             0x10005c8b8             540001a9                BLS 13(PC)
main.go:3             0x10005c8bc             f81e0ffe                MOVD.W R30, -32(RSP)
main.go:3             0x10005c8c0             f81f83fd                MOVD R29, -8(RSP)
main.go:3             0x10005c8c4             d10023fd                SUB $8, RSP, R29
main.go:4             0x10005c8c8             97ff4a9e                CALL runtime.printlock(SB)
main.go:4             0x10005c8cc             b0000000                ADRP 4096(PC), R0
main.go:4             0x10005c8d0             91214800                ADD $2130, R0, R0
main.go:4             0x10005c8d4             d28001a1                MOVD $13, R1
main.go:4             0x10005c8d8             97ff4cc2                CALL runtime.printstring(SB)
main.go:4             0x10005c8dc             97ff4ab9                CALL runtime.printunlock(SB)
main.go:5             0x10005c8e0             a97ffbfd                LDP -8(RSP), (R29, R30)
main.go:5             0x10005c8e4             910083ff                ADD $32, RSP, RSP
main.go:5             0x10005c8e8             d65f03c0                RET
main.go:3             0x10005c8ec             aa1e03e3                MOVD R30, R3
main.go:3             0x10005c8f0             97fff5c8                CALL runtime.morestack_noctxt.abi0(SB)
main.go:3             0x10005c8f4             17ffffef                JMP main.main(SB)
main.go:3             0x10005c8f8             00000000                ?
main.go:3             0x10005c8fc             00000000                ?
One thing to note, the objdump tool will by default disassemble the entire binary including all setup / runtime logic. We can use the -s flag which tells objdump to only disassemble symbols with names matching the regular expression.
In the output above, you get the following details for each column:
- The file and line number in the source code
- A memory address where the instruction is located
- The machine code (in hexadecimal) for the assembly instruction
- The assembly instruction (example above is
main: Mach-O 64-bit executable arm64)
pack
The pack tool can be used to create and manipulate archive files and is similar to the Unix ar command.
Here's a short example. Lets say we have two files in the main package, add.go which implements the Add function, and main.go which prints "Hello World":
package main

func Add(a, b int) int {
	return a+b
}
package main

func main() {
    println("Hello World!")
}
We can compile both files like so:
go tool compile -o add.o add.go
go tool compile -o main.o main.go
Now lets create an archive by using pack: go tool pack c lib.a main.o add.o
We have now bundled these object files and we can list out the contents of the archive like so:
❯ go tool pack t lib.a
__.PKGDEF
main.o
add.o
pprof
The pprof tool is used for profiling and can help developers analyze and visualize performance data. It collects various metadata such as cpu, memory, and go routines to determine if there are any bottlenecks and to ultimately optimize your go code.
Here's a short example:
package main

import (
	"fmt"
	"log"
	"net/http"
	_ "net/http/pprof"
)

func formatIntegers() {
	for i := 0; i < 1e12; i++ {
		_ = fmt.Sprintf("%d", i)
	}
}

func main() {
	for i := 0; i < 5; i++ {
		go formatIntegers()
	}

	log.Fatal(http.ListenAndServe("localhost:6060", nil))
}
Important notes:
- You must import
_ "net/http/pprof"which will invoke the init function within that package that will install handlers for a few URLs under/debug/pprof/and set up the HTTP server that serves the profiling data - The
formatIntegers()function will iterate over a loop and format an integer to a string - In main, spawn 5 go routines that invoke the format function and expose the http server
Now run the program via go run main.go and immediately in a separate terminal, invoke go tool pprof http://localhost:6060/debug/pprof/profile?seconds=30 which will start the profiling and collect metrics.
Here is the breakdown of that command:
❯ go tool pprof http://localhost:6060/debug/pprof/profile\?seconds\=30

Fetching profile over HTTP from http://localhost:6060/debug/pprof/profile?seconds=30
Saved profile in /Users/kavin/pprof/pprof.main.samples.cpu.002.pb.gz
File: main
Type: cpu
Time: May 31, 2024 at 4:06pm (EDT)
Duration: 30.01s, Total samples = 46.79s (155.94%)
Entering interactive mode (type "help" for commands, "o" for options)
(pprof) web
(pprof) top formatIntegers
Active filters:
   focus=formatIntegers
Showing nodes accounting for 1.25s, 2.67% of 46.79s total
Dropped 25 nodes (cum <= 0.23s)
Showing top 10 nodes out of 59
      flat  flat%   sum%        cum   cum%
     0.27s  0.58%  0.58%      0.66s  1.41%  runtime.mallocgc
     0.18s  0.38%  0.96%      0.28s   0.6%  runtime.findObject
     0.15s  0.32%  1.28%      0.27s  0.58%  fmt.(*fmt).fmtInteger
     0.11s  0.24%  1.52%      0.70s  1.50%  fmt.(*pp).doPrintf
     0.11s  0.24%  1.75%      0.47s  1.00%  runtime.wbBufFlush1
     0.10s  0.21%  1.97%      0.57s  1.22%  gcWriteBarrier
     0.10s  0.21%  2.18%      0.10s  0.21%  runtime.usleep
     0.09s  0.19%  2.37%      0.09s  0.19%  runtime.asyncPreempt
     0.07s  0.15%  2.52%      0.07s  0.15%  runtime.markBits.isMarked (inline)
     0.07s  0.15%  2.67%      0.16s  0.34%  sync.(*Pool).Put
Invoking web will allow us to use an interactive GUI in the browser. We can also top the formatIntegers call to see a breakdown in utilization.
Here is a screenshot of pprof:
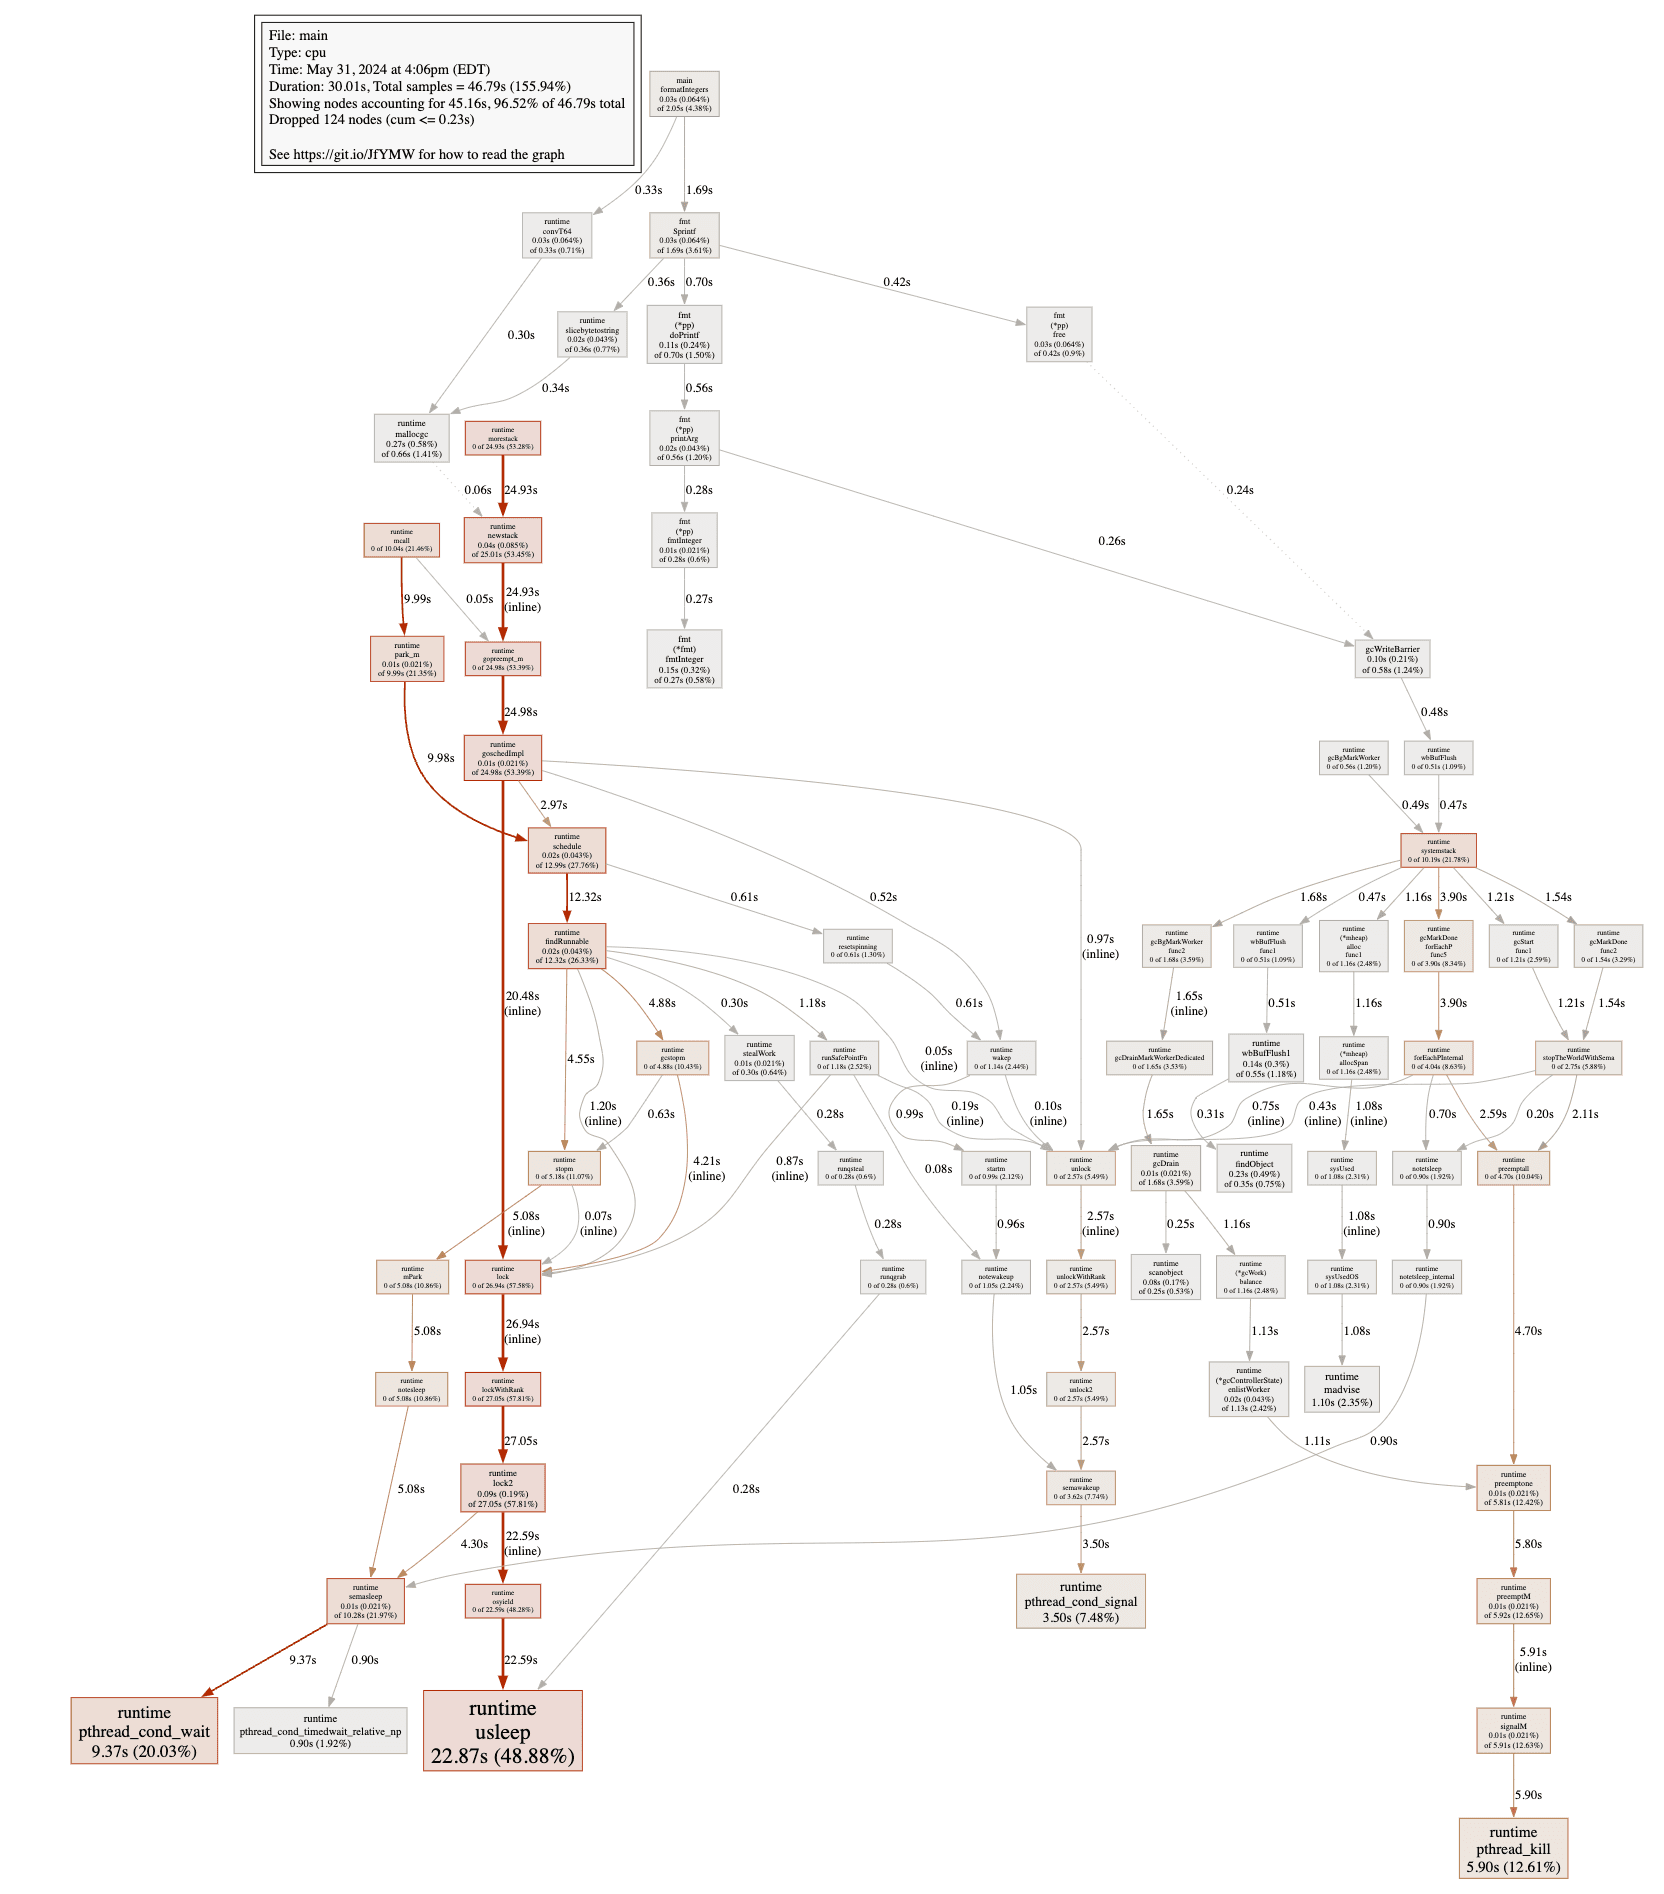
We can visualize the performance characteristics of the sample program and easily determine what bottlenecks exist!
test2json
The test2json tool converts the output of go test to a JSON format. This can be particularly useful for integrating with CI/CD systems or other tools that need to process test results programmatically.
Here's an example:
First create a go module: go mod init github.com/kavinaravind/go-test
Then a simple program like so with a Multiply function:
package main

import "fmt"

func Multiply(a, b int) int {
	return a * b
}

func main() {
	fmt.Println(Multiply(2, 3))
}
Heres a simple test defined in main_test.go for the Multiply function:
package main

import "testing"

func TestMultiply(t *testing.T) {
	if Multiply(2, 3) != 6 {
		t.Fail()
	}
}
You can now leverage test2json to print all test output as json!
❯ go test -v ./... | go tool test2json
{"Action":"start"}
{"Action":"run","Test":"TestMultiply"}
{"Action":"output","Test":"TestMultiply","Output":"=== RUN   TestMultiply\n"}
{"Action":"output","Test":"TestMultiply","Output":"--- PASS: TestMultiply (0.00s)\n"}
{"Action":"pass","Test":"TestMultiply"}
{"Action":"output","Output":"PASS\n"}
{"Action":"output","Output":"ok  \tgithub.com/kavinaravind/go-test\t0.143s\n"}
{"Action":"pass"}
trace
The go tool trace command is used to analyze and visualize the execution of Go programs. It can be extremely useful for understanding the runtime behavior of your Go programs, identifying performance bottlenecks, and optimizing concurrency.
Lets go through an example with the code below:
package main

import (
	"fmt"
	"os"
	"runtime/trace"
	"sync"
)

func main() {
	// Start a new trace
	f, _ := os.Create("trace.out")
	defer f.Close()

	trace.Start(f)
	defer trace.Stop()

	// Your program here
	var wg sync.WaitGroup

	for i := 1; i <= 10; i++ {
		wg.Add(1)
		go func(i int) {
			defer wg.Done()
			fmt.Println(i)
		}(i)
	}

	wg.Wait()
}
Here's what it does:
os.Create("trace.out")will create a new file namedtrace.outwhere the trace output will be written to.trace.Start(f)will start a new trace and direct all output to the trace file which will record events from all goroutines.defer trace.Stop()will stop the trace when the main function returns and using defer ensures that the trace will stop even if the function exits early due to an error or return statement.- We then mimick the same logic detailed in the
syncsection that spawns 10 go routines that print the incrementer.
We can then run: go tool trace trace.out which will prepare the trace for viewer and expose this via a GUI in the web browser. The image below shows the Process Trace.

Look how detailed and helpful this is! We can see all flow events, specifically the 10 separate go routines that were spawned and their exucation duration, and much more!
vet
Vet examines Go source code and reports suspicious constructs, such as Printf calls whose arguments do not align with the format string which can find errors not caught by the compilers.
Here's a simple example:
package main

import "fmt"

func main() {
	a := 1
	fmt.Printf("value: %s\n", a)
}
Using go vet:
❯ go vet main.go
# command-line-arguments
# [command-line-arguments]
./main.go:7:2: fmt.Printf format %s has arg a of wrong type int
This is really helpful as if we currently ran this code, we would get: value: %!s(int=1). After using %d as the format type, we then get value: 1.
I hope this helps shed light on go's standard library and the many go tools that exist for developers! 😊